
Adjusting image color and tone
You can notice the difference between the two pictures that is the Levels Adjustments
Please read more down.
Levels overview
You use the Levels adjustment to correct the tonal range and color balance of an image by adjusting intensity levels of image shadows, midtones, and highlights. The Levels histogram is a visual guide for adjusting the image key tones .
To open the Levels dialog box do one of the following :
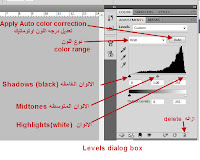 Diagram
To adjust the shadows and highlights manually, drag the black and white Input Levels sliders to the edge of the first group of pixels at either end of the histogram.
 |
| The Original Photo |
 |
| After adjustment |
You can notice the difference between the two pictures that is the Levels Adjustments
Please read more down.
You use the Levels adjustment to correct the tonal range and color balance of an image by adjusting intensity levels of image shadows, midtones, and highlights. The Levels histogram is a visual guide for adjusting the image key tones .
To open the Levels dialog box do one of the following :
- Click the Levels icon or a Levels preset in the Adjustments panel.
- Choose Layer > New Adjustment Layer > Levels. Click OK in the New Layer dialog box.
- Choose Image > Adjustments > Levels.
Diagram - To adjust the the black color drag the black head of the slider .
- To adjust the the white color drag the white head of the slider.
- To adjust midtones, use the middle Input slider to make a gamma adjustment.
- You can also use the Auto button to auto adjust the tone of your pictures
- You can delete the whole layer if you do not like the results .
- You can also select the color mode if RGB or CMYK.
Thanks
MR
MR

No comments:
Post a Comment
Thanks.