
Sharpening is the definition of edges in an image.
You can read more here.
Notes and tips

You can read more here.
Notes and tips
- Sharpen your image on a separate layer so that you can resharpen it later.
- If you sharpen your image on a separate layer, set the layer’s blending mode to Luminosity to avoid color shifts along edges.
- Sharpening increases image contrast. If you find that highlights or shadows are clipped after you sharpen, use the layer blending controls (if you sharpen a separate layer) to prevent sharpening in highlights and shadows.
- If you need to reduce image noise, do so before sharpening so that you don’t intensify the noise.
- Sharpen your image multiple times in small amounts.
Sharpen using Smart Sharpen
Using the filter menu.[Filter menu -Sharpen -Smart Sharpen ]
1 - Zoom the document window to 100% to get an accurate view of the sharpening.
2 - Choose Filter > Sharpen > Smart Sharpen.
3 - Set the controls in the Sharpen tabs:
2 - Choose Filter > Sharpen > Smart Sharpen.
3 - Set the controls in the Sharpen tabs:

- Amount
- Radius
- Remove
Gaussian Blur: is the method used by the Unsharp Mask filter. Lens Blur: detects the edges and detail in an image, and provides finer sharpening of detail and reduced sharpening halos.
Motion Blur: attempts to reduce the effects of blur due to camera or subject movement. Set the Angle control if you choose Motion Blur.
- Angle
- More Accurate
4 - Adjust sharpening of dark and light areas using in the Shadow and Highlight tabs. (Click the Advanced button to display the tabs).
How to use it ?
1-If your image is multilayered, select the layer containing the image you want to sharpen.You can apply Unsharp Mask to any layer even the linked or grouped.

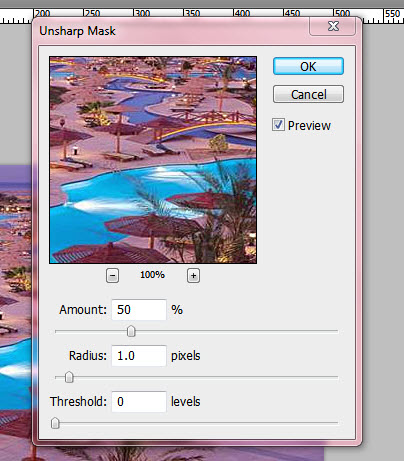
Sharpen using Unsharp Mask
The Unsharp Mask sharpens an image by increasing contrast along the edges in an image.You specify the radius of the region to which each pixel is compared. The greater the radius, the larger the edge effects, oversharpening an image produces a halo effect around the edges.
How to use it ?
1-If your image is multilayered, select the layer containing the image you want to sharpen.You can apply Unsharp Mask to any layer even the linked or grouped.
2-Choose Filter > Sharpen > Unsharp Mask. Make sure the Preview option is selected.
3-Radius: Drag the slider or enter a value to determine the number of pixels surrounding the edge pixels that affect the sharpening. The greater the radius value, the wider the edge effects. And the wider the edge effects, the more obvious the sharpening.
4-Amount: Drag the slider or enter a value to determine how much to increase the contrast of pixels.
4-Amount: Drag the slider or enter a value to determine how much to increase the contrast of pixels.
5-Threshold: Drag the slider or enter a value.
Notice :If applying Unsharp Mask makes already bright colors appear overly saturated, choose Edit > Fade Unsharp Mask and choose Luminosity from the Mode menu.
Sharpen selectively
By using a mask or a selection .For example, you can use an edge mask with the Unsharp Mask filter on a portrait to sharpen the eyes, mouth, nose, and outline of the head, but not the texture of the skin.
Sharpen a selection
1-With the image layer selected in the Layers panel, draw a selection.
2-Choose Filter > Sharpen > Unsharp Mask. Adjust the options and click OK.
1-With the image layer selected in the Layers panel, draw a selection.
2-Choose Filter > Sharpen > Unsharp Mask. Adjust the options and click OK.
Sharpen an image using an edge mask
There are many ways to create an edge mask.


- Open the Channels panel and select the channel that displays the gray-scale image with the greatest contrast in the document window. Often, this is the green or the red channel.
- Duplicate the selected channel.
- With the duplicate channel selected, choose Filter > Stylize > Find Edges.

- Select Image > Adjustments > Invert to invert the image.

- With the inverted image still selected, choose Filter > Other > Maximum. Set the radius to a low number and click OK to thicken the edges and randomize the pixels.
- Choose Filter > Noise > Median. Set the radius to a low number and click OK. This averages the neighboring pixels.
- Choose Image > Adjustment > Levels and set the black point high to get rid of random pixels.
- Choose Filter > Blur > Gaussian Blur to feather the edges.
Notice that The Maximum, the Median, and the Gaussian Blur filters soften the edge mask so that the sharpening effects blend better in the final image. Although all three filters are used in this procedure, you can experiment using only one or two.
- In the Channels panel, Ctrl-click (Windows) or Command-click (Mac OS) the duplicate channel to make the edge mask a selection .
- In the Layers panel, select the image layer. Make sure the selection is still visible on the image.
- Choose Select > Inverse.
- With the selection active on the image layer, choose Filter > Sharpen > Unsharp Mask. Set the desired options and click OK.
- To view your results, select the RGB channel in the Channels panel and deselect the selection in the image.

No comments:
Post a Comment
Thanks.