THE QUOTE OF THE DAY .

The clock is ticking. Are you becoming the person you want to be?

Sunday, June 26, 2011

Eighth Wonder of the World

Eighth Wonder of the World is a term sometimes used to describe things in comparison to the Seven Wonders of the World.


For understanding the meanings of this .
Wonders of the World are lists according to the age of man made constructions to.


Seven Wonders of the Ancient World : the popularly known ancient list.( there is a post in the blog please just click the link)
Wonders of the World :
New Seven Wonders of the World : contemporary attempt to create a list of new seven wonders to update the Seven Wonders of the Ancient World concept with a modern list of wonders.It is
  1. Chichen Itza ,Yucatán, Mexico .
  2. Christ the Redeemer ,Rio de Janeiro, Brazil .
  3. Colosseum, Rome, Italy.

Friday, June 24, 2011

Obesity And Weight loss with Photoshop

BEFORE look for the face and cheeks also .

AFTER


 Obesity is a medical condition in which excess body fat has accumulated to the extent that it may have an adverse effect on health, leading to reduced life expectancy and/or increased health problems.


Body mass index  BMI :

Tuesday, June 21, 2011

Artificial Flowers And How To Design It With Photoshop

Artificial flowers and imitations of natural flowers are sometimes made for scientific purposes (the collection of glass flowers at Harvard University, for example, which illustrates the flora of the United States), but more often as articles for commercial or residential decoration.


Materials used in their manufacture have included painted linen and shavings of stained horn in Egypt, gold and silver in ancient Rome, rice-paper in China, silkworm cocoons in Italy, colored feathers in South America, and also wax and tinted shells.


Modern techniques involve carved or formed soap, nylon netting stretched over wire frames, ground clay, and mass-produced injection plastic mouldings. Polyester is the major material for manufacturing of artificial flowers since 1970s. Most artificial flowers in the market nowadays are made of polyester fabrics.


Types of flowers according to its material 

Sunday, June 19, 2011

Presentation Of Our Blog New Video

Welcome To Our Photo Album .


It explains the idea of my blog ,and shows some designs related to me ,and shows my designing . 


I hope you will like it .
Thanks
MR


Change The Look Of your Photos With Video Tutorial


That is the original picture of the famous Egyptian actor Hussein Fahmi and his wife .


 Two colors of the Photoshop manipulated picture as if it was drawn by hand  


 HOW TO CHANGE THE LOOK OF YOUR PHOTO ?
1)    Open the picture in Photoshop

Saturday, June 18, 2011

Working with an image in Photoshop Lesson ( 6 )

Duplicate an image

Duplicate an entire image including all layers, layer masks, and channels :

  •   Open the image .
  • Choose Image > Duplicate.  
  • Enter a name for the duplicated image.  
    Duplicate the image and merge the layers :
    Select Duplicate Merged Layers Only, Click OK.

        Remove red eye

    The Red Eye tool removes red eye in flash photos of people or animals.

    1- In RGB Color mode, select the Red Eye tool . (The Red Eye tool is in the same group as the Spot Healing Brush tool . Hold down a tool to display additional tools in the group.)
    2- Click in the red eye. If you are not satisfied with the result, undo the correction, set one or more of the following options in the options bar, and click the red eye again:
    Pupil Size
    Increases or decreases the area affected by the Red Eye tool.

     
     Smudge image areas
    Simulates the effect of dragging a finger through wet paint .The tool picks up color where the stroke begins and pushes it in the direction you drag.

    How to use the tool 
    1 - Select the Smudge tool .
    2 - Choose a brush tip and options for the blending mode in the options bar.
    3 - Select Sample All Layers in the options bar to smudge using color data from all visible layers. If this is deselected, the Smudge tool uses colors from only the active layer.
    4 - Select Finger Painting in the options bar to smudge using the foreground color at the beginning of each stroke. If this is deselected, the Smudge tool uses the color under the pointer at the beginning of each stroke.
    5 - Drag in the image to smudge the pixels.

    Blur image 
    The Blur tool softens hard edges or reduces detail in an image. The more you paint over an area with the tool, the more blur it becomes .

    How to use the tool 
    1 - Select the Blur tool .
    2 - Do the following in the options bar:
    • Choose a brush tip and set options for the blending mode and strength in the options bar
    • Select Sample All Layers in the options bar to blur using data from all visible layers. If this is deselected, the tool uses data from only the active layer.
     3 - Drag over the part of the image you want to blur.
    [ you can also use the blur filter in the filter menu]

     Sharpen image 
    The Sharpen tool increases contrast along edges to increase apparent sharpness. The more you paint over an area with the tool, the sharpen effect increases.
    1-Select the Sharpen tool .
    2-Do the following in the options bar:
      •Choose a brush tip and set options for the blending mode and strength in the options bar.
      •Select Sample All Layers in the options bar to sharpen using data from all visible layers. If this is    deselected, the tool uses data from only the
    active layer.
        3Drag over the part of the image you want to sharpen.


      Dodge or burn areas
    Used to lighten or darken areas of the image[ lighten an area on the print (dodging) or increase the exposure to darken areas on a print (burning).]more you paint over an area with the Dodge or Burn tool, the lighter or darker it becomes.

    1- Select the Dodge tool or the Burn tool.
    2-Choose a brush tip and set brush options in the options bar. 
    3- In the options bar, select one of the following from the Range menu: 
    • Midtones :Changes the middle range of grays.
    • Shadows :Changes the dark areas.
    • Highlights :Changes the light areas.
    4-Specify the exposure for the Dodge tool or the Burn tool.
    5-Click the airbrush button to use the brush as an airbrush. Alternatively, select the Airbrush option in the Brushes panel.
    6-Select the Protect Tones option to minimize clipping in the shadows and highlights. This option also tries to keep colors from shifting hue.
    7-Drag over the part of the image you want to lighten or darken.

    Friday, June 17, 2011

    Forest ... With Illustrator Designing Lesson


    A forest, also referred to as a wood or the woods .

    It is an area with a high density of trees.A forest is an area of land with many trees. Many animals need forests to live and survive. Forests are very important and can be found all over the World. Many forests are being cut down for houses to be built because of overpopulation.This cutting down of forests is called deforestation and it is causing damage to the natural habitat of animals. Even roads have been built for the peoples to pass though the forest to reach their destination. People have gotten rid of forest to build towns cities, farms, factories and other things that we will use.


    Distribution 
    Forests can be found in all regions capable of sustaining tree growth, at altitudes up to the tree line, except where natural fire frequency or other disturbance is too high, or where the environment has been altered by human activity. 
    The tree line is the edge of the habitat at which trees are capable of growing. Beyond the tree line, they are unable to grow because of inappropriate environmental conditions (usually cold temperatures, insufficient air pressure, or lack of moisture) 


     I tried to imagine the forest ,and designed that picture to show what is in my mind .I collected  some trees and planets like grass .I added also some animals like the zebra and some birds.I liked the view of the butterflies  so I added some also.I collected all of that in an art work around a nice small house in an artistic way as what I imagined .I put that art work in on frame .
    I hope you will like it.I need your opinion.


    HOW TO DESIGN THE PICTURE WITH DIAGRAMS ?
    Please read more . 

    Illustrator Learning [ TOOLS ]Lesson ( 1 )


    Illustrator 


    Illustrator's diagram.
    That is the illustrator over look to help understanding the explanation that I am giving.
    • It shows the menu bar.
    • The options bar.
    • Tabbed Document windows. To move from document to another.
    • The Tools panel that contains tools for creating and editing images, artwork, page elements, and more.
    •  The control panel  (The option bar) displays options for the currently selected tool.
    • The Document window shows the file you are working on.
    • The status bar  at the lower-left edge of the illustration window. 
    Please read more down .

    Tuesday, June 14, 2011

    Bananas

    Bananas is a very delicious type of fruit . Many adults like it and also kids.
    It is not only delicious fruit, but it is also an important for our health.   
    The original picture  
    The photoshop manipulated picture I just used the Spot Healing Brush Tool to clean it  

    Very easy way 


    Never, put your banana in the refrigerator!!!
    This is interesting.
    After reading this, you'll never look at a banana in the same way again...
    Bananas contain three natural sugars - sucrose, fructose and glucose combined with fiber. A banana gives an instant, sustained and substantial boost of energy.


    Research has proven that just two bananas provide enough energy for a strenuous 90-minute workout. No wonder the banana is the number one fruit with the world's leading athletes.


    But energy isn't the only way a banana can help us keep fit. It can also help overcome or prevent a substantial number of illnesses and conditions, making it a must to add to our daily diet..


    Banana helps preventing a number of illnesses and conditions such as 


    Depression :
    According to a recent survey undertaken by MIND amongst people suffering from depression, many felt much better after eating a banana. This is because bananas contain tryptophan, a type of protein that the body converts into serotonin, known to make you relax, improve your mood and generally make you feel happier.


    PMS :
    Forget the pills - eat a banana. The vitamin B6 it contains regulates blood glucose levels, which can affect your mood.


    Anemia :
    High in iron, bananas can stimulate the production of hemoglobin in the blood and so helps in cases of anemia.


    Blood Pressure :
    This unique tropical fruit is extremely high in potassium yet low in salt, making it perfect to beat blood pressure. So much so, the US Food and Drug Administration has just allowed the banana industry to make official claims for the fruit's ability to reduce the risk of blood pressure and stroke.


    Brain Power :
    200 students at a Twickenham (Middlesex) school ( England ) were helped through their exams this year by eating bananas at breakfast, break, and lunch in a bid to boost their brain power. Research has shown that the potassium-packed fruit can assist learning by making pupils more alert.


    Constipation :
    High in fiber, including bananas in the diet can help restore normal bowel action, helping to overcome the problem without resorting to laxatives.


    Hangovers :
    One of the quickest ways of curing a hangover is to make a banana milkshake, sweetened with honey. The banana calms the stomach and, with the help of the honey, builds up depleted blood sugar levels, while the milk soothes and re-hydrates your system.


    Heartburn :
    Bananas have a natural antacid effect in the body, so if you suffer from heartburn, try eating a banana for soothing relief.


    Morning Sickness :
    Snacking on bananas between meals helps to keep blood sugar levels up and avoid morning sickness.


    Mosquito Bites :
    Before reaching for the insect bite cream, try rubbing the affected area with the inside of a banana skin. Many people find it amazingly successful at reducing swelling and irritation.


    Nerves :
    Bananas are high in B vitamins that help calm the nervous system.


    Overweight :
    And at work? Studies at the Institute of Psychology in Austria found pressure at work leads to gorging on comfort food like chocolate and chips. Looking at 5,000 hospital patients, researchers found the most obese were more likely to be in high-pressure jobs. The report concluded that, to avoid panic-induced food cravings, we need to control our blood sugar levels by snacking on high carbohydrate foods every two hours to keep levels steady.


    Ulcers :
    The banana is used as the dietary food against intestinal disorders because of its soft texture and smoothness. It is the only raw fruit that can be eaten without distress in over-chronicler cases. It also neutralizes over-acidity and reduces irritation by coating the lining of the stomach.


    Temperature control :
    Many other cultures see bananas as a "cooling" fruit that can lower both the physical and emotional temperature of expectant mothers.. In Thailand , for example, pregnant women eat bananas to ensure their baby is born with a cool temperature.


    Seasonal Affective Disorder (SAD) :
    Bananas can help SAD sufferers because they contain the natural mood enhancer tryptophan.


    Smoking &Tobacco Use :
    Bananas can also help people trying to give up smoking. The B6, B12 they contain, as well as the potassium and magnesium found in them, help the body recover from the effects of nicotine withdrawal.


    Stress :
    Potassium is a vital mineral, which helps normalize the heartbeat, sends oxygen to the brain and regulates your body's water balance.. When we are stressed, our metabolic rate rises, thereby reducing our potassium levels. These can be re balanced with the help of a high-potassium banana snack.


    Strokes :
    According to research in The New England Journal of Medicine, eating bananas as part of a regular diet can cut the risk of death by strokes by as much as 40%.


    Warts :
    Those keen on natural alternatives swear that if you want to kill off a wart, take a piece of banana skin and place it on the wart, with the yellow side out. Carefully hold the skin in place with a plaster or surgical tape!


    So, a banana really is a natural remedy for many ills. When you compare it to an apple, it has four times the protein, twice the carbohydrate, three times the phosphorus, five times the vitamin A and iron, and twice the other vitamins and minerals. It is also rich in potassium and is one of the best value foods around So maybe its time to change that well-known phrase so that we say, "A banana a day keeps the doctor away!"


    PASS IT ON TO YOUR FRIENDS
    PS: Bananas must be the reason monkeys are so happy all the time! I will add one here; want a quick shine on our shoes?? Take the INSIDE of the banana skin, and rub directly on the shoe...polish with dry cloth. Amazing fruit !!!

    Monday, June 13, 2011

    Sunglasses And how to add shadow to it with Photoshop

    The original picture of the sunglasses.


    The Photoshop manipulated picture 


    Sunglasses or sun glasses are a form of protective eyewear designed primarily to prevent bright sunlight and high-energy visible light from damaging or discomforting the eyes. They also help cancel out harmful ultraviolet radiation (UV) rays from the sun and blue light, which can cause several serious eye problems . They can sometimes also function as a visual aid .


    Ultraviolet (UV) light is electromagnetic radiation with a wavelength shorter than that of visible light, but longer than X-rays, in the range 10 nm to 400 nm, and energies from 3eV to 124 eV. It is named because the spectrum consists of electromagnetic waves with frequencies higher than those that humans identify as the color violet.
    Although ultraviolet is invisible to the human eye, most people are aware of the effects of UV through the painful condition of sunburn, but the UV spectrum has many other effects, both beneficial and damaging, to human health.


    Functions of the sunglasses :


    * Visual clarity and comfort ,
    Sunglasses can improve visual comfort and visual clarity by protecting the eye from glare [ Glare is difficulty seeing in the presence of bright light such as direct or reflected sunlight or artificial light such as car headlamps at night.] 

    * Protection
    Sunglasses offer protection against excessive exposure to light, including its visible and invisible components.
     
    * Further functions of sunglasses
       To be used in sports ,space ,and  under water .


    Applying the shadow to the sunglasses with photoshop manipulation .


    Saturday, June 11, 2011

    Replace color in image areas by Photoshop (Lesson 5)

      The Color Replacement tool simplifies replacing specific colors in an image. You can paint over a targeted color with a corrective color. The Color Replacement tool doesn’t work in images in Bitmap, Indexed, or Multichannel color modes.


    How to use the tool 

    1- Select the Color Replacement tool [under the Brush Tool] .
    2- Choose a brush tip size in the options bar ,keep the blending mode set to Color
    3- For the Sampling option, choose one of the following
    • Continuous ,Samples colors continuously as you drag.
    • Once ,Replaces the targeted color only in areas containing the color that you first click.
    • Background Swatch  ,Replaces only areas containing the current background color.
    4- For the Limits option, select one of the following:
    • Discontiguous  ,Replaces the sampled color wherever it occurs under the pointer.
    • Contiguous  , Replaces colors that are contiguous with the color immediately under the pointer.
    • Find Edges  , Replaces connected areas containing the sampled color while better preserving the sharpness of shape edges.
    5- For tolerance, enter a percentage value or drag the slider. Choose a low percentage to replace colors very similar to the pixel you click, or raise the percentage to replace a broader range of colors. 
    6- To define a smooth edge in the corrected areas, select Anti-aliased.
    7- Choose a foreground color to replace the unwanted color.
    8- Click the color you want to replace in the image.
    9- Drag in the image to replace the targeted color.
      

    Blending modes
    • Normal : the default mode.Edits or paints each pixel to make it the result color.
    • Dissolve: the result color is a random replacement of the pixels with the base color or the blend color, depending on the opacity at any pixel location.
    • Behind : Edits or paints only on the transparent part of a layer .
    • Clear : Edits or paints each pixel and makes it transparent.
    • Darken : make the color darker.
    • Multiply: Multiplying any color with black produces black.
    • Color Burn : increasing the contrast,with white no change .
    • Linear Burn : decreasing the brightness.  with white no change.
    • Lighten : Pixels darker than the blend color are replaced, and pixels lighter than the blend color do not change .
    • Screen : The result color is always a lighter color, with black leaves the color unchanged.
    • Color Dodge : decreasing contrast , with black produces no change.
    • Linear Dodge (Add) : increasing the brightness, with black produces no change.
    • Overlay : Multiplies or screens the colors, depending on the base color.The base color is not replaced, but mixed with the blend color to reflect the lightness or darkness of the original color.
    • Soft Light : Darkens or lightens the colors.
    • Hard Light : The effect is similar to shining a strong spotlight on the image.This is useful for adding highlights to an image.
    • Vivid Light: Burns or dodges the colors by increasing or decreasing the contrast.
    • Linear Light : Burns or dodges the colors by decreasing or increasing the brightness.
    • Pin Light : Replaces the colors. This is useful for adding special effects to an image.
    • Hard Mix : Adds the red, green and blue channel values of the blend color to the RGB values of the base color.
    • Difference : subtracts either the blend color from the base color or the base color from the blend color, depending on which has the greater brightness value.
    • Exclusion : Creates an effect similar to but lower in contrast than the Difference mode. Blending with white inverts the base color values. Blending with black produces no change.
    • Hue : Creates a result color with the luminance and saturation of the base color and the hue of the blend color.
    • Saturation.
    • Color.
    • Luminosity : Creates a result color with the hue and saturation of the base color and the luminance of the blend color. This mode creates the inverse effect of Color mode.
    • Lighter Color .
    • Darker Color .

    Friday, June 10, 2011

    Retouching and Repairing images with Photoshop (Lesson 4)

     Clone Stamp tool: 

    The Clone Stamp tool paints one part of an image over another part of the same image or over another part of any open document that has the same color mode. You can also paint part of one layer over another layer. The Clone Stamp tool is useful for duplicating objects or removing a defect in an image.You can also use the Clone Stamp tool to paint content on video or animation frames.
    To use the Clone Stamp tool, you set a sampling point on the area you want to copy (clone) the pixels from and paint over another area.
    You can use any brush tip with the Clone Stamp tool, which gives you good control over the size of the clone area.

    How to use the tool
    •   Select the Clone Stamp tool . 
    •  Choose a brush tip and set brush options for the blending mode, opacity, and flow in the options bar. 
    •  Samples data from the layers you specify. To sample from the active layer and visible layers below it, choose Current And Below. To sample only from the active layer, choose Current Layer. To sample from all visible layers, choose All Layers. To sample from all visible layers except adjustment layers, choose All Layers and click the Ignore Adjustment Layers icon to the right of the Sample pop-up menu.
    •  Alt-clicking the area you want to sample it .
    •  Drag over the area of the image you want to correct.
    Retouch with the Healing Brush tool
    The Healing Brush tool lets you correct imperfections, causing them to disappear from the image. You use the Healing Brush tool to paint with sampled pixels from an image or pattern.


    How to use the tool.
    Almost the same like the Clone Stamp tool .here you Drag in the image.

    Notice: If there is a strong contrast at the edges of the area you want to heal, make a selection before you use the Healing Brush tool. The selection should be bigger than the area you want to heal but should precisely follow the boundary of contrasting pixels. When you paint with the Healing Brush tool, the selection prevents colors from bleeding in from the outside
     

    Retouch with the Spot Healing Brush tool  

    It quickly removes blemishes and other imperfections in your photos.
    The Spot Healing Brush works similarly to the Healing Brush: it paints with sampled pixels from an image or pattern and matches the texture, lighting, transparency, and shading of the sampled pixels to the pixels being healed. Unlike the Healing Brush, the Spot Healing Brush doesn’t require you to specify a sample spot. The Spot Healing Brush automatically samples from around the retouched area.If you need to retouch a large area or need more control over the source sampling, you can use the Healing Brush instead of the Spot Healing Brush. 

    How to use the tool.
    •  Select the Tool .
    •  Choose a brush size in the options bar. A brush that is slightly larger than the area you want to fix works better .
    •  Choose a Type option in the options bar:
      Proximity Match
      Uses the pixels around the edge of the selection to find an image area to use as a patch
      for the selected area. If this option doesn’t provide a satisfactory fix, undo the fix and try the Create Texture option.
      Create Texture
      Uses all the pixels in the selection to create a texture with which to fix the area. If the texture doesn't work, try dragging through the area a second time.
    •  Select Sample All Layers in the options bar to sample data from all visible layers. Deselect Sample All Layers to sample only from the active layer.
    •   Click the area you want to fix, or click and drag to smooth over imperfections in a larger area
     Patch an area 
     
    The Patch tool lets you repair a selected area with pixels from another area or a pattern.You can also use the Patch tool to clone isolated areas of an image.


    Notice: When repairing with pixels from the image, select a small area to produce the best result. 
     
    Uses of The Patch Tool
     
    1 - Repair an area using sampled pixels 

    • Select the Patch tool .
    • Do one of the following:
      •Drag in the image to select the area you want to repair, and select Source in the options bar.
      •Drag in the image to select the area from which you want to sample, and select Destination in the options bar.
       Notice : You can also make a selection prior to selecting the Patch tool.
    •  To adjust the selection, do one of the following:
      •Shift-drag in the image to add to the existing selection.
      •Alt-drag) in the image to subtract from the existing selection.
      •Alt+Shift-drag in the image to select an area intersected by the existing selection.

    • To extract texture with a transparent background from the sampled area, select Transparent. Deselect this option if you want to fully replace the target area with the sampled area.
        Notice that the Transparent option works best for solid or gradient backgrounds with clearly distinct textures (such as a bird in a blue sky).
    • Position the pointer inside the selection, and do one of the following: 
            •If Source is selected in the options bar, drag the selection border to the area from which you               want to sample. When you release the mouse button, the originally selected area is patched               with the sampled pixels.
            •If Destination is selected in the options bar, drag the selection border to the area you want to              patch. When you release the mouse button, the newly selected area is patched with the
    sampled pixels. 


    2 - Repair an area using a pattern 

    • Select the Patch tool .
    • Drag in the image to select the area you want to repair.
      Note: You can also make a selection prior to selecting the Patch tool.
    • If desired, complete steps 3-4 above to adjust the selection and apply pattern texture with a transparent background.
    • Select a pattern from the Pattern panel in the options bar, and click Use Pattern.

    Thursday, June 9, 2011

    Seven Wonders of the Ancient World

    The Seven Wonders of the World (or the Seven Wonders of the Ancient World) refers to remarkable constructions of classical antiquity .
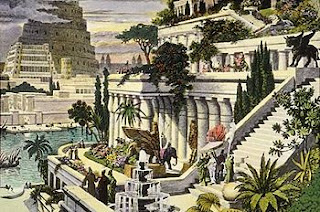
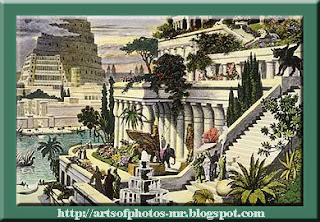
    The original picture of Hanging Gardens of Babylon [imaginary picture] 


    The Photoshop manipulated picture 


    The most prominent of these, the versions by Antipater of Sidon and an observer identified as Philon of Byzantium, comprise seven works located around the Mediterranean rim. The original list inspired innumerable versions through the ages, often listing seven entries. Of the original Seven Wonders, only one—the Great Pyramid of Giza, the oldest of the ancient wonders—has remained relatively intact until the present day.


     1 - Great Pyramid of Giza : Built by Egyptian Pharaoh Khufu .It was believed to have been built as the tomb of the pharaoh.It Still in existence The name of the modern location is Giza Necropolis, Egypt .

    2 - Hanging Gardens of Babylon : Built by the king of the Neo-Babylonian Empire - Nebuchadnezzar II - for his wife - Amytis of Media .It was multi-levelled gardens reaching 22 metres (75 feet) high, complete with machinery for circulating water. Large trees grew on the roof. It was destroyed with Earthquake After 1st century BC .The name of the modern location is Al Hillah, Babil Province, Iraq . 

    3 - Temple of Artemis at Ephesus :  Built by Lydians, Persians, Greeks ,and was dedicated to the Greek goddess Artemis, it took 120 years to build. Herostratus burned it down to achieve lasting fame.Herostratus was a young man and historic arsonist seeking notability who burned down the Temple of Artemis in ancient Greece. Rebuilt by Alexander the Great only to be destroyed again by the Goths.  .The name of the modern location is near Selçuk, Izmir Province, Turkey .

    4 - Statue of Zeus at Olympia : Built by Greeks Occupied the whole width of the aisle of the temple that was built to house it, and was 12 meters (40 feet) tall.It was destroyed by fire  .The name of the modern location  Olympia, Greece .

    5 - Mausoleum of Halicarnassus :  Origin of the word mausoleum, the tomb built for Mausolus a satrap in the Persian Empire , Built by Carians, Persians, Greeks  Stood approximately 45 meters (150 feet) tall, with each of the four sides adorned with sculptural reliefs.Satrap was the name given to the governors of the provinces of the ancient Median and Achaemenid (Persian) Empires .
    Cause of destruction .The original structure was destroyed by flood. A new structure was built and was damaged by an earthquake and eventually disassembled by European Crusaders.  The name of the modern location is Bodrum, Turkey .

    6 - Colossus of Rhodes : Built by Greeks It is a giant statue of the Greek god Helios, god of the sun, c. 35 m (110 ft) tall.  It was destroyed by Earthquake .The name of the modern location is Rhodes, Greece .

    7 - Lighthouse of Alexandria : Built by Hellenistic Egypt, (Greeks) Between 115 and 135 meters (380 – 440 ft) high, it was among the tallest structures on Earth for many centuries. The name of the island that it was built on, Pharos, eventually became the Latin word for lighthouse, pharos .     It was destroyed by Earthquake .  The name of the modern location is Alexandria, Egypt .
      
    Sorry No Photoshop lesson Today.
     The post is long do I had added a simple design 
    and add a simple frame for the picture with Costum Shap Tool.


    Thanks
    MR

    Wednesday, June 8, 2011

    Khufu And Adding Photoshop Frame to his picture


     Khufu was a Pharaoh of Ancient Egypt's Old Kingdom,from around 2589 to 2566 BC. Khufu was the second pharaoh of the Fourth Dynasty after his father Sneferu . He is generally accepted as being the builder of the Great Pyramid of Giza which is one of the Seven Wonders of the Ancient World .
    Khufu's full name was "Khnum-Khufu" which means "the god Khnum protects me.
    was the son of King Sneferu and Queen Hetepheres . 


    Khufu had nine sons, one of whom, Djedefra, was his immediate successor. He also had fifteen daughters, one of whom would later become Queen Hetepheres II. 


    His Life 
    Khufu came to the Egyptian throne in his twenties, and reigned for about 23 years,some other sources reported 63 years and some others mentions 50 years .


    Funerary monuments. 
    Most likenesses of Khufu are lost to history. Only one miniature statuette has been fully attributed to this pharaoh.He is credited with building the single largest building of ancient times The Great Pyramid.
    There are some other pieces discovered is now on display in the Egyptian Museum, Cairo.
    An empty sarcophagus is located in the King's Chamber inside the pyramid though it is unclear if it had ever been used for such a purpose as burial.
    Three small pyramids to the east of Khufu's pyramid are tentatively thought to belong to two of his wives, and the third has been ascribed to Khufu's mother Hetepheres I.
     A series of mastabas [ A mastaba is a type of Ancient Egyptian tomb in the form of a flat-roofed, rectangular structure with outward sloping sides that marked the burial site of many eminent Egyptians of Egypt's ancient period. Mastabas were constructed out of mud-bricks or stone. ] were created adjacent to the small pyramids, and tombs have been found in this "cemetery". The closest tombs to Khufu's were those belonging to Prince Kawab and Khufukhaf I and their respective wives .


    Khufu ship 
    The Khufu ship is an intact full-size vessel from Ancient Egypt that was sealed into a pit in the Giza pyramid complex at the foot of the Great Pyramid of Giza around 2500 BC. The ship was almost certainly built for Khufu (King Cheops), the second pharaoh of the Fourth Dynasty of the Old Kingdom of Egypt.


      I searched some resources to get that informations 


    You can notice now the original picture of king Khufu , how it is very simple .I wanted to add to it different look so I make it a stamp .


    HOW TO MAKE ? Please read more .


    Tuesday, June 7, 2011

    Adjusting images [crop, rotation, and canvas] by Photoshop ( Lesson 3)

     Cropping an images: 
    It is the removing of a part of an image to create focus or strengthen it .It is done with the Crop Tool.
    Crop an image using the Crop tool


    • Select the Crop tool .
    • With the mouth drag over the part of the image you want to keep to create a marquee.You can adjust ,move or scale and rotate it to the area you like to keep .
    • press enter or check the right tick up. 


    Cropping options:
    • Specify whether you want to use a cropping shield to shade the area of the image that will be deleted or hidden. When Shield is selected, you can specify a color and opacity for the cropping shield. When Shield is deselected, the area outside the cropping marquee is revealed.
    • Specify whether you want to hide or delete the cropped area. Select Hide to preserve the cropped area in the image file it is better than deleting it so you can get it back if you like.The Hide option is not available for images that contain only a background layer so you can make layer from back ground by Rt click the background layer in the layer panel and choose layer from back ground.


    Rotate or flip an entire image 
    The Image Rotation commands let you rotate or flip a hole image .It do not work on individual layers or part of a layers .For that purpose you can use the Transform or Free Transform Tools and commands .
    Choose Image > Image Rotation, and choose one of the following  from the submenu:
    * 180°    
    Rotates the image by a half-turn.

    * 90° CW    Rotates the image clockwise by a quarter-turn.
    * 90° CCW    Rotates the image counterclockwise by a quarter-turn. 
    * Arbitrary     Rotates the image by the angle you specify .


    Canvas Size.
    It is the full editable area around the image.
    Choose Image > Canvas Size.
     T he example of it to be easy to understand the post of canvas of that blog.


    Make a frame for your image with canvas.  
     
    • You can make a photo frame by increasing the canvas size and filling it with a color. 
    • You can also make a styled photo frame ,It’s best to do this on a copy of your photo

    Sunday, June 5, 2011

    Photoshop Tool Panel [Box].( Lesson 2)


      Selections Tools .
    •   Rectangular Marquee Tool.To create rectangular or square shapes.
    •   Elliptical Marquee Tool .To create elliptical or circular shapes.
    •  Lasso Tool. To select the area around the shape you like(freehand).
    •  Polygonal Lasso Tool.
    •  Magnetic Lasso Tool.
    •  Quick Selection Tool, quick selection using an adjustable round brush tip
    •  Magic Wand Tool  ,selects similarly colored areas .
    •  The Move Tool.  moves selections, layers, and guides ,
    •   The Crop Tool ,trims images.

       Crop and slice tools .
    •  The Crop tool trims images.
    • The Slice tool creates slices.
    • The Slice Select tool selects slices. 
       
    Retouching tools .
    •  The Spot Healing Brush tool removes blemishes and objects .
    • The Healing Brush tool paints with a sample or pattern to repair an image .
    • The Patch tool repairs  a selected area of an image using a sample or pattern. 
    • The Red Eye tool removes the red reflection caused by a flash .
    • The Clone Stamp tool paints with a sample of an image .
    • The Pattern Stamp tool paints with part of an image as a pattern.
    • The Eraser tool erases pixels and restores parts of an image to a previously saved state.
    • The Background Eraser tool erases areas to transparency by dragging.
    • The Magic Eraser tool erases solid-colored areas to transparency with a single click.
    • The Blur tool blurs hard edges in an image.
    • The Sharpen tool sharpens soft edges in an image.
    • The Smudge tool smudges data in an image.
    • The Dodge tool lightens areas in an image.
    • The Burn tool darkens areas in an image.
    • The Sponge tool changes the color saturation of an area.

       Drawing and Painting tools.
    •  Brush Tool , paints brush strokes.
    •  Pencil Tool  , paints brush strokes.
    •  Eraser Tool.   Under it there is  -Background Eraser Tool.
    •  Paint Bucket Tool. under it there is Gradient Tool to allow the user to use the gradient colors 
    •  Text Tool. allows you to write what you like .
    •  Shape Tools.Allows you to draw shapes with colors .---Rectangle Tool.
      ---Rounded Rectangle Tool . 
      ---Ellipse Tool.
      ---Polygon Tool.
      --- Line shape Tool .
      ---Custom Shape Tool. 

      COLOR SELECTION TOOLS.
    • Color selection for background and foreground  is very easy just click the tiles on the tool box to open the dialog box to choose the color you like .
    •  Eyedropper Tool . It is a very useful tool by which you can get a sample color from your photo. To use it click the eyedropper and click inside the document window . click with your cursor on the color you want to select .

    Notes, measuring and navigation tools .

    •  The Eyedropper tool samples colors in an image.
    • The Ruler tool is a measuring tool for distances, locations, and angles.
    • The Note tool makes notes that can be attached to an image. 
    • The Counting tool counts objects in an image. 
    •  The Hand tool moves an image within its window.
    • The Zoom tool magnifies and reduces the view of an image.
    • The Rotate View tool non-destructively rotates the canvas.
      3D tools. 
    • The 3D Rotate tool ,rotates the model around its x-axis .
    • The 3D Roll tool , rotates the model around its z-axis .
    •  The 3D Pan tool pans the camera in the x or y direction .
    • The 3D Slide tool drags side to side to move the model horizontally, or up and down to move the model closer or farther away.
    • The 3D Scale tool scales the model larger or smaller.
    • The 3D Orbit tool orbits the camera in the x or y direction .
    • The 3D Roll View tool rotates the camera around the z-axis .
    • The 3D Pan View tool pans the camera in the x or y direction .
    • The 3D Walk View tool walks the camera.
    • The 3D Zoom tool changes the field of view closer or farther away.
    How to Select a tool ?  
    Do one of the following:
    •  Click a tool in the Tools panel ( Box ).       or 
    • Press the tool’s keyboard shortcut.  

    Photo-shop workspace [ Interface] (Lesson 1)

     Known as outside of the box.


    Photo shop diagram to show the bars and panels .I thought it is useful for understanding . 

      • Menu  bar : found on the top of the window. It contains the file,edit ,image and layer and other menus .
      • Beside the Menu Bar there is the  Application Bar showing the Hand Tool, Zoom Tool and Rotate View tool and Arrange Document and Screen Mode  
      • Tool Option bar : found under the menu bar.It shows the options of the selected tool .
      • Tool box : by default it is found on the left side of the window.It shows the different photoshop tools
      • Pallets : or pans it is found on the left side of the window.Like the layer pallet and color and others.
    Create A New Document .
    Select the Menu Bar >File>New  or use shortcut Ctrl -N.A new dialog box will appear to choose width ,hight ,and also you will choose pixel ,cm or points .

     
     Saving A File? 

    There are three ways
    • From File menu select Save . From the format choose photoshop to keep all your layers.
    • From File menu select Save as to choose other format like JPEG or PNG or GIF or choose another place for the file . 
    • From File menu you can also save for web. to use on web pages ,it should be small in size and light for uploading.  


    Thursday, June 2, 2011

    Djoser and The Step Pyramid [ Photoshop Auto - Blend]

    Djoser or Zoser or Netjerikhet, meaning "body of the gods.


    He  is the best-known pharaoh of the Third dynasty of Egypt . He is believed to have ruled for 19 years or, 38 years ( if the 19 years were biennial taxation years )
    He commissioned his official, Imhotep, to build the first of the pyramids, a step pyramid for him at Saqqara.
    Djoser is best known for his innovative tomb, which dominates the Saqqara landscape. In this tomb he is referred to by his Horus name Netjerykhet; Djoser is a name given by New Kingdom visitors thousands of years later.
    There is a painted limestone statue of Djoser, now in the Egyptian Museum in Cairo, is the oldest known life-sized Egyptian statue. Today at the site in Saqqara where it was found, a plaster copy of the statue stands in place of the original. The statue was found during the Antiquities Service Excavations of 1924-1925.


    The two pictures combined  together with photoshop
    ( using Auto-Blend) 

    Djoser


    His most famous monument was his step pyramid, which entailed the construction of several mastaba tombs[ 6 mastaba ] one over another. These forms would eventually lead to the standard pyramid tomb in the later Old Kingdom.


    Pyramid of Djoser or the step pyramid


    Pyramid of Djoser or the step pyramid.
    It is an archeological remain in the Saqqara necropolis, Egypt, northwest of the city of Memphis. It was built for the burial of Pharaoh Djoser by his vizier Imhotep, during the 27th century BC.


    This first Egyptian pyramid consisted of six mastabas (of decreasing size) built atop one another in what were clearly revisions and developments of the original plan. The pyramid originally stood 62 metres (203 ft) tall, with a base of 109 × 125 m (358 × 410 ft) and was covered by polished white limestone. The step pyramid (or proto-pyramid) is considered to be the earliest large-scale cut stone construction. 


     I wanted to combine the two pictures in different way . I had imagined that the soul of the king is arround the place to look after his pyramid .


    I used here the Auto - Blend  so it is our topic today.


    Arts Of Photos Feed Headline Animator

    Like